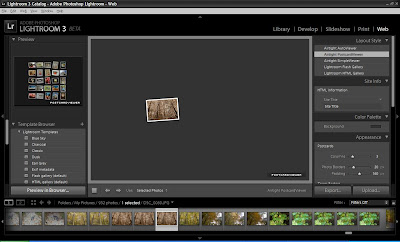
This module will assist you in preparing your photos in a collection to display on your website.
The first thing you'll want to do is click on the Web module in the upper right hand corner of the Lightroom 3 interface.
Once there it is as easy as choosing your photos, choosing a template / format to display them in and then customizing your site with things like title, description, contact information and many more options.
The first thing I did was to choose my Collection of random photos from the photo browser window near the bottom of the Lightroom 3 interface.
You can select multiple photos by holding the CTRL key and clicking on them. Under the "Use" option just above this drop down you can choose to use selected photos or an entire Collection.
Once you've selected your photos, you can choose the Layout Style in the top right hand side of the screen.
The options for layout styles are;
Airtight AutoViewer - a self contained look, one picture at a time, sliding right to left.
Airtight Postcard Viewer - similar to the one above, but it will have the photos looking as if they are scattered on a table, mouse over and they get larger and move, click on them to view in a similar style to the above layout style, click on them again to return to the postcard view.
Airtight Simple Viewer - a simple layout style with the photo thumbnails on the left, and selected photo in larger view on the right. Click to view full photo, click again to return to the main screen.
Lightroom Flash Gallery - This layout style offers very clean Flash based designs for the photo gallery. On the left hand side you can choose between many different templates for a custom look. The one pictured below is the Default Flash Gallery template, but there are many others to choose from... I'll show you the one I created at the bottom of the post.
Lightroom HTML Gallery - don't let this one fool you, there are some nice HTML Gallery templates that can be customized to come up with a very unique and stylish design.
Once you've selected your Layout Style, you can then set a myriad of options such as;
Site Info - set the name of the site, title of the collection and list contact information
Color Pallette - customize the look of the gallery site by changing border, title, text color and more
Appearance - change the look and feel of the thumbnails and full size photos
Image Info - choose to list the photo Title and Caption or other information about the photo such as exposure or other available image information fields
Output Settings - set copyright information, watermarks and sharepening
Upload Settings - setup your server connections to upload the final product directly from Lightroom to your site
Note: Be sure to select your template style before editing the above information. Choosing a new style afterwards will set all above information back to the default settings for the template.
Now that you've selected your template and edited the options to your liking, it's time to publish that masterpiece to the web. As long as you have all your connection information setup, just click Upload and then sit back and wait as Lightroom creates your site and uploads all necessary files to your server.
It can take a bit depending on how many photos you have selected and based on the output settings you have chosen. My site took approximately 30 minutes for Lightroom to create and publish.
Click here to see the live version.
Lightroom 3 has many great features that make it easy for a photographer to organize, edit, manipulate, categorize, and publish in multiple formats. This will definitely be an application that I'll pick up when it finishes the beta. Until then - go ahead and grab a copy and experiment for yourself to see how useful this application can be... and feel free to drop me a line to let me know your tips and tricks.


No comments:
Post a Comment